
Saturday, July 31, 2010
Bun B (Feat. Gucci Mane & Yo Gotti) - Countin' Money
Bun B (Feat. Gucci Mane & Yo Gotti) - Countin' Money
*WORLD PREMIERE*
Directed by Mr. Boomtown
http://twitter.com/mrboomtown
Rap-a-lot Records Presents Bun B "Trill O.G.". Album in stores Aug 3rd!
Friday, July 30, 2010
Waka Flocka Spits A Acapella Freestyle Taking Shots At Slick Pulla & Bloodraw With French Montana
Waka Flocka Spits A Acapella Freestyle Taking Shots At Slick Pulla & Bloodraw With French Montana
Thursday, July 29, 2010
Wednesday, July 28, 2010


Small Tyme Ballaz – Alabama River

Off the upcoming Small Tyme Ballaz Muzik & Bulletz mixtape.
DOWNLOAD: Small Tyme Ballaz – Alabama River
DJ Toomp Confirms Work On Kanye West's "Good Ass Job"
DJ Toomp Says Kanye West "Good Ass Job" Album Is Incredible from DJ Smallz on Vimeo.
DJ Toomp Confirms Work On Kanye West's "Good Ass Job"
Tuesday, July 27, 2010
20 Tips on Using Effects in the Mix
The way you use effects and processors can make or break a mix. Paul White offers 20 useful tips to help you get it right first time.
Recording can be fun, but for me, the most rewarding part of any project is doing the final mix. It’s at this stage of the proceedings that effects and signal processors can be used to turn a simple recording into a major production — but it’s also easy to overdo things and spoil the end results. This month I’ve put together 20 easy-to-remember tips that will allow you to control your effects units rather than vice versa. And so, without further ado and in no particular order of importance:
1. Reverb creates the illusion of space, but in doing so it also ’smears’ the stereo localisation of the original sound source, just as it does in real life. If you want to maintain a specific stereo placement for one or more sounds in a mix, consider using a mono reverb effect and panning the reverb to the same position as the original dry sound.
2. Reverb is very useful for making vocals sound more musical and for making them sit with the rest of the mix, but adding too much will have the effect of pushing the vocals back, rather than allowing them to take front position. Experiment with pre-delay values of 60-100mS to help counter this, and also try using a reverb patch that has a lot of early reflections, as these help reinforce the dry sound. You can learn a lot from listening carefully to records you like to see how much and what type of reverb is used. Often it’s rather less than you think.
3. Bright reverbs can flatter vocals, but may exaggerate sibilance. As an alternative to de-essing the vocals, try instead de-essing the feed to the reverb unit, so that sibilance is removed before the reverb is applied.
lexicon reverb plugin
4. Reverb is probably the most important effect in the studio, so don’t compromise by using a low-quality software reverb plug-in just because you’re short of processing power. Use a good external hardware reverb unit if you have one, otherwise choose a more powerful software plug-in to treat the vocal track in non-real time. This may involve off-line processing or doing a real-time ‘bounce to disk’ of the vocal track in isolation, via the plug-in.
5. Vocals almost always require compression, but rather than doing all the compressing at the recording stage, apply a little less compression than you think you might ultimately need, then add further compression when you come to mix. This dual-stage process ensures you don’t record an overcompressed sound, whilst still allowing you to even out the level of the recorded signal.
manley voxbox
6. Compressors bring up low-level noise just as effectively as they do low-level signals, so try to gate the signal prior to compression when you’re mixing. Also, use no more compression than you need, or the signal-to-noise ratio may be compromised unnecessarily. However, it’s usually unwise to gate the compressor input during recording for the reasons explained in the next tip.
7. Avoid gating during recording if at all possible, as a badly set gate can completely ruin an otherwise good take by chopping out low-level sections of the wanted audio. Instead, gate during mixing, when you have the chance to reset the parameters and try again if it doesn’t work out first time. A further benefit of this approach is that any noise, crosstalk or spill accumulated during recording will also be gated out.
8. Always gate signals prior to adding reverb if you can — gates can easily chop off the tail end of a long reverb. Furthermore, if you add reverb or echo after gating, any minor gating artifacts may be completely
“It’s at the mix stage of proceedings that effects and signal processors can be used to turn a simple recording into a major production — but it’s also easy to overdo things and spoil the results.”
hidden by the natural decay of the reverb or echo. Any noise added to the mix by the reverb unit should be negligible providing you’ve paid attention to gain structure and level setting when adjusting the effects.
pro tools gate
9. Don’t always set your gate to fully attenuate the signal when the gate is closed. In some situations, it may sound more natural if a low level of background sound is still audible between wanted sounds, and when working with drums, you’ll find the gate opens faster if the range control is set to around 12dB rather than to maximum.
10. Single-ended noise-reduction units (the type that work by applying level-dependent top-cut) can be very useful in reducing the perceived level of hiss during material where there are no silences that would allow a gate or expander to operate. However, make constant A/B comparisons to ensure that there’s no obvious top-end loss when the unit is switched in. If there is, lower the threshold slightly until you get an acceptable compromise between high-end loss during low-level passages, and audible hiss. As with gates, applying reverb after dynamic filtering may help disguise any side-effects as well as safeguarding the reverb tails from being truncated.
11. Don’t add long reverb to bass sounds unless you have an artistic reason to do so, as this tends to muddy the low end of the mix. If you need to add space to a kick drum, try a short ambience program or a gated reverb as an alternative. If you are in a position where you need to apply reverb to an entire drum mix, roll off the low end feeding the reverb for a cleaner sound.
12. Chorus is a useful effect for creating the illusion of space and movement, but it also tends to push sounds back in the mix, rather as reverb does. If you need a sound treated with chorus to stand out in a mix, try either panning a dry version of the sound to one side and a chorused version to the other, or ensure that the song’s arrangement leaves plenty of room for the chorused sound.
14. Equalisation is often used as an alternative to getting a sound right at source, but the result is seldom as satisfactory as doing things properly. Nevertheless, on occasions where equalisation is necessary, applying cut to the over-emphasised frequencies rather than boost to weaker ones generally results in a more natural sound, especially with vocals and acoustic instruments. This is especially true of in-desk equalisers or budget parametrics, as they often sound nasal or phasey when used to boost mid-range sounds.
15. Sounds can often be made to sit better in a mix by ‘bracketing’ them with high- and low-pass filters so as to restrict their spectral content. Many console EQs don’t have the sharp filters necessary to do this, but the side-chain filters fitted to many gates are often ideal for the job. Simply set the gate to its side-chain listen mode, then use the filters to shave away unwanted high and low frequencies. Acoustic guitars often work better in a mix if the low end is rolled off in this way, though the high end can usually be left alone.
16. When setting up a mix, try to get the mix sounding close to right before you add any effects or signal processing. Once you’ve got this right, add further vocal compression if needed and also apply just enough reverb to make the vocals sit comfortably with the backing track. When you’re happy with the overall timbre and balance, adding effects for ‘effect’ should be easier. Remember that, in most cases, effects are there just to add the final gloss — they won’t compensate for a poor balance or bad basic sounds.
17. Still on the subject of effects in the mix, don’t be tempted to hide poor playing by heaping on more effects, it never works — take it from someone who’s tried everything at one time or another! However, thanks to the wonders of modern technology, slightly imperfect vocal pitching can be tightened up almost magically using pitch-correction processors, such as Antares’ Autotune software or ATR1 hardware.
anteres autotune
18. Go easy when using enhancers to treat complex signals such as a whole mix as it’s very tempting to go too far. Make frequent use of the bypass button to remind yourself just how radically the sound has changed, and if you’re adding more than a little high-end enhancement, check the bottom end to see if that needs bringing up to keep the overall mix in balance.
19. Often it’s better to enhance just some elements of a mix so as to make them stand out from the rest. The best way to do this is to connect the enhancer to a pair of group insert points, then send all the sounds that need enhancing to that group. Listen carefully to enhanced vocals as the process can often exaggerate sibilance problems.
20. Treatments designed to increase the stereo width of a mix (other than the simple mixing-antiphase-signals-into-the-opposite-channel trick) can have detrimental effects on mono compatibility. Use your console’s mono button to check that your mix doesn’t lose too much when it’s played in mono, as this is important when material is played over mono radios or TVs. Listen to see if the subjective balance or timbre changes by an unacceptable degree. If it does, either use less overall width expansion or leave the main mix elements untreated and only process secondary sounds, such as incidental percussion, sound effects, effects returns and so on.
Akai MPC vs Native Instruments Battery 3
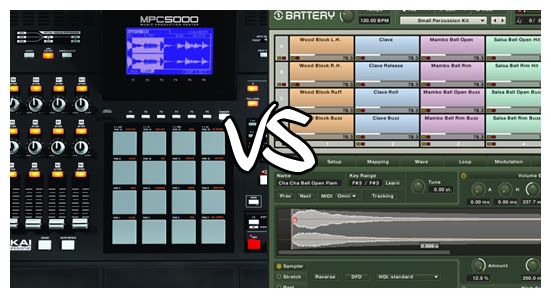
Akai MPC vs Native Instruments Battery 3
Ok, so lemme start off by saying I’ve been using an Mpc since birth so I may be a little biased. I’ve always got compliments on my “big sound” which I feel I owe partly to the Akai Mpc’s outputs. I don’t think anybody can actually put their finger on it, but for some reason some stuff just sounds better when it comes out of an Mpc.
With alot of producers switching to software, spending “akai” money is becoming less of a necessity. All you need is a drum program or editor to start banging out beats. That’s where Battery3 comes in. It’s affordable, easy to use, and is becoming a go to virtual instrument for alot of us, including myself.
Now, on to the battle…
Out of the Box- The Mpc comes with nothing more than a power cord and the unit itself and manual. Doesn’t even come with any drum sounds!
Battery3 comes with a 12gb sound library dvd and the install disc. I will say that about 3/4 of the sound library is useless in hip hop production.

Pads or Keys? I personally enjoy using the Mpc4000 pads to sequence my drum tracks. Using Battery3 and a midi keyboard just doesn’t cut it for me. However you can use Akai’s MPD controller to give you the Mpc feel using Battery 3 and save a buck.
Sequencing- Well, Battery 3 is not a sequencer so you’ll have to use a host program like Pro Tools if you want to sequence a track using it.
(advantage MPC)
Sampling- I’m not much of a sampling guy so I probably can’t judge this fairly, but editing a sample on a huge computer monitor while using Battery 3 is much better than the Mpc’s baby screen (non color) hands down. You can tune, add effects, compression, adjust lengths and start points, stack and filter with Battery 3 in seconds. It all goes back to the visual part of editing. I’m sure some of you will complain about the chopping in battery as opposed to the Mpc, but like I said, I don’t sample much, feel free to give me your feedback on this one.
(advantage Battery3)
Learning Curve – If you’re new to making beats, either of these may be difficult to use out of the box. If you’ve been using vst’s and software sequencing you may be able to pick up on battery3. If you’ve been using workstations for creating then the Mpc may not be so challenging. Having used both, I feel like Battery3 is easier to pick up. Everything is pretty much right in front of your face. Where as with the Mpc, there’s a lot of menus and windows you have to go through to accomplish simple tasks like adding reverb or other fx. Another thing to take into consideration is the setup process of both of these. If you’re new to the production world, you may find it difficult to get all your midi and audio cables routed correctly as opposed to popping in a dvd and installing. Since most people use computers every day, I’m gonna give this one to NI.
(advantage Battery3)
Cost- no need to get too deep into this one, Akai’s Mpc will set you back in the 500-2000.00 range depending on your needs, I have the Mpc4000 and it cost me 1500…. USED! Battery3 will set you back about 2-300 new.
(advantage Battery3)
Sound Quality- Now if you’ve never used an Mpc then you may disagree, but all of us who have will know what I’m talking about. There’s something about the Mpc’s more so the older versions Mpc2000, 3000, 4000 that just add a nice fatness to your drums. I’ve used the newer 1000 and 500 and didn’t notice it so much. I can load the exact same sample into my Mpc4000 and into Battery3 for some reason it just sounds better coming out of the Mpc. Is it the ouputs? I’m guessing so, they just add the right amount of the so called “grittyness” to the sound. I think that’s why alot of big producers today still go with the Mpc for their drum programming. These guys can buy anything they want, and they still have their old Mpc’s.
Not that the sound from Battery3 isn’t good enough, it’s just not equal to me. I
(advantage Mpc)
FX/Features – Depending on which model of Mpc you buy this will be different for you. I have the 4000 so that’s what I’ll refer to. Onboard Fx consist of the standard, Chorus, Delay, Flange, Pan, Phaser, Reverbs, the usual stuff for the Mpc. They all sound pretty good, no complaints. I just don’t find myself using them much because I prefer to add in fx during the mixdown or tracking process. Battery3 has the same stuff as well, but I feel like I use them quite a bit more. Possibly because they’re right in your face and easier to adjust on your computer screen then on Akai’s small screen.
A feature that really bothered me about Battery3 is not being able to play one sample across all the keys with the tuning changing for each note. So if you have an 808 loaded up you can’t play a high 808 and a deep 808 from the same sample. You have to load it up twice and tune each one individually. With the Mpc, I select my 808 pad, hit the 16 levels button, select tuning, and I’m breaking windows with my bass. Well not really, but you get it. It will assign 16 levels of tuning for the chosen sample. If you make hip hop tracks, this is a great feature. Another thing I didn’t like about battery3 was the note repeat. If you make alot of “down south” type tracks, you’ll probably be adding tripled hi hats and snare rolls. As simple as hitting the note repeat button in the Mpc, coupled with the 16 levels you can have your snares rolling and pitch shifting in seconds. To do this in Battery3 I was a little lost. You have to setup your pitchbend assignment to adjust the tuning of the assigned sample, you’d think it’d automatically do this. Nope! Then you have to go to the setup menu and adjust the note repeat and for some reason it just doesn’t sound natural. Like the timing lags a little bit. Could just be me, but I prefer to do this on the Mpc.
(advantage Mpc)
Overall – This is my own personal opinion. If I had to make a decision on which is better suited for myself. I’m sticking with the Mpc. I’ve used both extensively and I just feel I make better music using the Mpc to host and program my drum samples. The swing, the output, the pads, note repeat and 16 levels. These are things I use in almost every track. It could be that I’ve just gotten used to using the Mpc and it’s a much faster creation process to me. If you’re on a tight budget, Battery3 is a great option, but keep in mind it doesn’t sequence. If Battery had note repeat, 16 levels, sample and pitch tune across the keys , I’d like it alot more.
T-Pain Autotune Settings

Here are the settings for Autotune EVO that I found work pretty well to acheive a good sound that’s not overly robotic.
Scale – Major
Input Type – Alto/Tenor
Retune Speed – 0
Humanize – 0
Natural Vibrato – 0
ALL VIBRATO SETTINGS ON RIGHT – 0
Amplitude – 30
Formant – 100
Pitch Amount – 18
Once you have it all setup play with the KEY setting up top next to Scale.
You should have it set the same as the key of the music you’re playing if you want it to sound in tune.
Check out the screenshot for the visual.

Once you have it how you like it, select the preset pulldown and create a new setting so its always there and you don’t have to setup everytime.
SMALL TYME BALLAZ - CERTIFIED (REMIX) - MUZIK & BULLETZ - GRADE A MUZIK
SMALL TYME BALLAZ - CERTIFIED (REMIX) - MUZIK & BULLETZ - GRADE A MUZIK
Montgomery Alabama Stand Up!!!!
New Apple Magic Trackpad [Multi-Touch Gadget]
New Apple Magic Trackpad [Multi-Touch Gadget]
The new Magic Trackpad is the first Multi-Touch trackpad designed to work with your Mac desktop computer. It uses the same Multi-Touch technology you love on the MacBook Pro. And it supports a full set of gestures, giving you a whole new way to control and interact with what's on your screen. Swiping through pages online feels just like flipping through pages in a book or magazine. And inertial scrolling makes moving up and down a page more natural than ever. Magic Trackpad connects to your Mac via Bluetooth wireless technology. Use it in place of a mouse or in conjunction with one.


YAMAHA MOTIF DRUM KITS

Yahmah Motif Drum Kits
As I begin to diversify the Milk Crate Breaks blog
I'd like to provide something else for my Producer clientele.
while I'm a FIRM believer of the "Sample your OWN drums & never go stock" philosophy
but I wanted to drop some basic necessities as i did with the
Drum Machines post
So here are some Drum kits from The Yamaha Motif in WAV format to be used in almost any software sampler/drium machine you can possibly be using
DOWNLOAD
How To Rewire Logic & Reason
How To Rewire Logic & Reason
A short tutorial explaining how to set up a ReWire connection in Logic Studio, so you can take advantage of the thousands of samples and virtual instruments in Reason.

The Life of David Gosey
The Life of David Gosey
“You can’t ask for what you want unless you know what it is. A lot of people don’t know what they want or they want much less than they deserve. First you have figure out what you want. Second, you have to decide that you deserve it. Third, you have to believe you can get it. And, fourth, you have to have the guts to ask for it.”
-Barbara De Angelis
Unedited Behind the scenes Dustin Beamer video shoot
Unedited Behind the scenes Dustin Beamer video shoot
Dallas Austin Talent Search
Dallas Austin Talent Search
@ Darp Studios 4-10-2010
Dallas Austin Talent Search @ Darp Studios
Songwriters & Producers Networking
Chize Money Salute Me Behind the Scenes
Chize Money Salute Me Behind the Scenes
Video Directed by Mr. Grind.
If you want to do Business with Mr. Grind His email Info.
Email: short334@gmail.com
Gucci Mane Spoof Mr. Grind(as Coogi Mane) The Zoo HD
Gucci Mane Spoof Mr. Grind(as Coogi Mane) The Zoo HD
This is Mr. Grind as his Character Coogi Mane. This is a parody of the rapper Gucci Mane.
Follow Mr. Grind on Twitter
http://www.twitter.com/mrgrind
Follow David Gosey on Twitter
http://www.twitter.com/davidgosey
Facebook Freestyle Roast Part 3
David Gosey Beats (Background Music)--->>>Facebook Freestyle Roast Part 3
This Video is a part 3 to the Facebook Roast series.. I hope everyone gets a good Laugh. This Get Requested like crazy. I don't really like this one as much as the Other 2 but you should still catch a few laughs. Stay tuned for more Comedy
Where's Jr? - Mini Comedy Movie - Starring Mr. Grind
This is a Comedy Mini Series Directed by Mr. Grind which features the Main Characters L.C. and Jr. They both are grown men that stay at home with their grandmother. Jr. is the brother that always gets into trouble.
Justin Bieber Parody - Baby - Mr. Grind(as Dustin Beamer) - Keisha Oh
Check out the Justin Bieber Parody - Baby - Mr. Grind(as Dustin Beamer) - "Keisha Oh"
We shot this video with a Panasonic HMC-150 Camcorder.
Directed by Mr.Grind
Co-Directed by David Gosey
Edited by Mr.Grind
Subscribe to:
Posts (Atom)